
Based on the issue category, follow the decision tree provided and use the following universal troubleshooting best practices:
For every issue:
-
- Identify the exact symptom(s)
- Confirm affected location(s), individual(s), and device(s)
- Determine whether the issue is active or intermittent
- Retest after completing each check
- Escalate with documented findings only
Sensor Specifications and Quick Pairing Guide Links:
1. #1 Sensor Health Check -Sensor Decision Tree Quick Links:
Sensor Troubleshooting - All Sensors
First checks
Note: these checks can be completed by RSPs and agency technicians
-
- Confirm the sensor is communicating with the Remote Dashboard.
- From the Location Details page, find the device towards the bottom of the page. Battery Power and last check-in fields (highlighted below) are good indicators the sensor is active
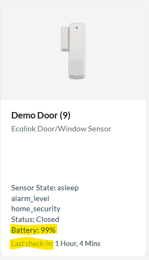
- From the Location Details page, find the device towards the bottom of the page. Battery Power and last check-in fields (highlighted below) are good indicators the sensor is active
-
Check for the sensor on the 'Advanced Rules' section of the dashboard. If you don't see the sensor listed it may have to be re-paired to the hub.

- Click Add Rule button
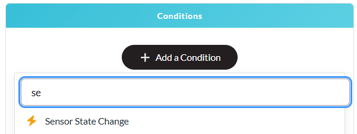
- Search for Sensor State Change in the Add a Condition field
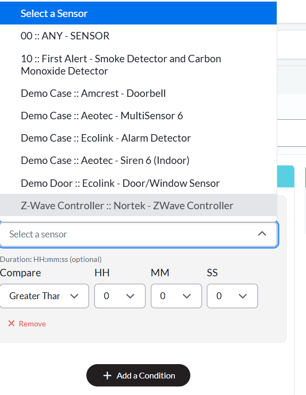
- The sensor should show in the Select a Sensor list if it is currently paired to the hub
- Pro Tip - Test that sensor!
- Request assistance on-site to trigger the sensor. If you are troubleshooting a door sensor, open the door with the installed sensor making sure to keep the door in a opened position.
- Refresh
 your web browser via the refresh tab.
 - Observe the Status of the sensor, you should now see status 'Open'
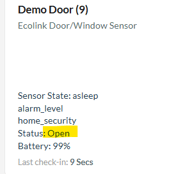
- If the status does not change on the dashboard, addtional investigation is required.
- Confirm the sensor is communicating with the Remote Dashboard.
Onsite checks
Note: these checks can be completed by DSPs, individuals, family, or paid backup staff and should not require a Technician unless additional triage is required that can't be accommodated by the current staff on-site.
Primary Check: Physical & Power Verification-
- Battery Status: Check if the LED indicator on the sensor blinks when triggered. Green blinking indicator lights show the sensor is operational, blue lights could indicate the sensor is in pair mode and blinking red could represent a physical fault or low power.
- Action: if LED indicator doesn't respond, replace the battery with a fresh cell (e.g., CR123A, CR2032, or AA depending on the device).
- Battery Status: Check if the LED indicator on the sensor blinks when triggered. Green blinking indicator lights show the sensor is operational, blue lights could indicate the sensor is in pair mode and blinking red could represent a physical fault or low power.
-
- Physical Tamper Switch: Ensure the sensor cover is snapped shut completely to engage the internal tamper switch.
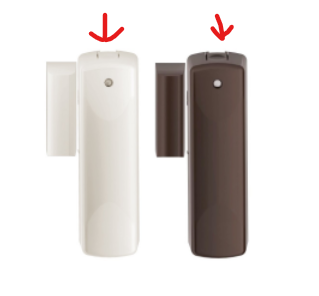
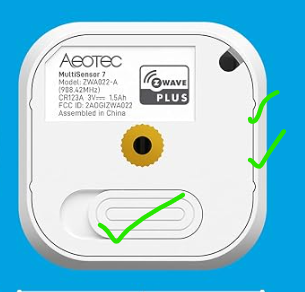
- Physical Tamper Switch: Ensure the sensor cover is snapped shut completely to engage the internal tamper switch.
Agency Technician Checks
- *Pro Tip - Try pairing a new sensor to validate if the current sensor at hand is the culprit or if additional triage is required with the z-wave functionality.
- If First Remote checks and Onsite checks are completed and the sensor has been tested and replaced with a known working sensor, the root issue could be the Hub, Connectivity, or Local Network. Move to the Hub Decision Tree.
Escalate to SLS when:
-
- Sensors are confirmed to have power, hub has been rebooted and reporting a status of 'Online' on the Hearo Dashboard.
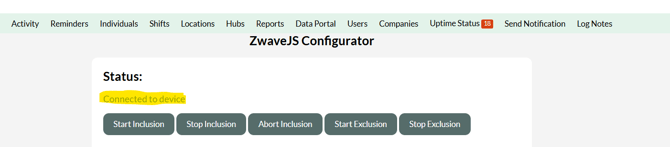
- The zwave Configurator status shows a different notification Status than 'Connected to Device' see below.
Sensor Online but Not Communicating to Dashboard - Decision Tree
First checks
- Are the rules setup and configured properly? Check out this video on how to setup the advanced rules.
- Restart services to the hub. Click here for instructions.
Agency Technician Checks
- Move the sensor closer to the Hub and trigger the sensor. If the signals from sensor log in the dashboard, a Z-wave range extender may be needed to extend signal from the Hub to the sensor's location
- If moving the sensor doesn't produce signals to the dashboard, unpair and re-pair the sensor.
Escalate to SLS when:
-
- Sensors are confirmed to have power, hub has been rebooted and reporting a status of 'Online' on the Hearo Dashboard.
- The zwave Configurator status shows a differnt notfication Status than 'Connected to Device' see below.